Docker Guide

Docker 是一種軟體平台,可讓您快速地建立、測試和部署應用程式。Docker 將軟體封裝到名為容器的標準化單位,其中包含程式庫、系統工具、程式碼和執行時間等執行軟體所需的所有項目。使用 Docker,您可以將應用程式快速地部署到各種環境並加以擴展,而且知道程式碼可以執行。
Containers and VMs comparison 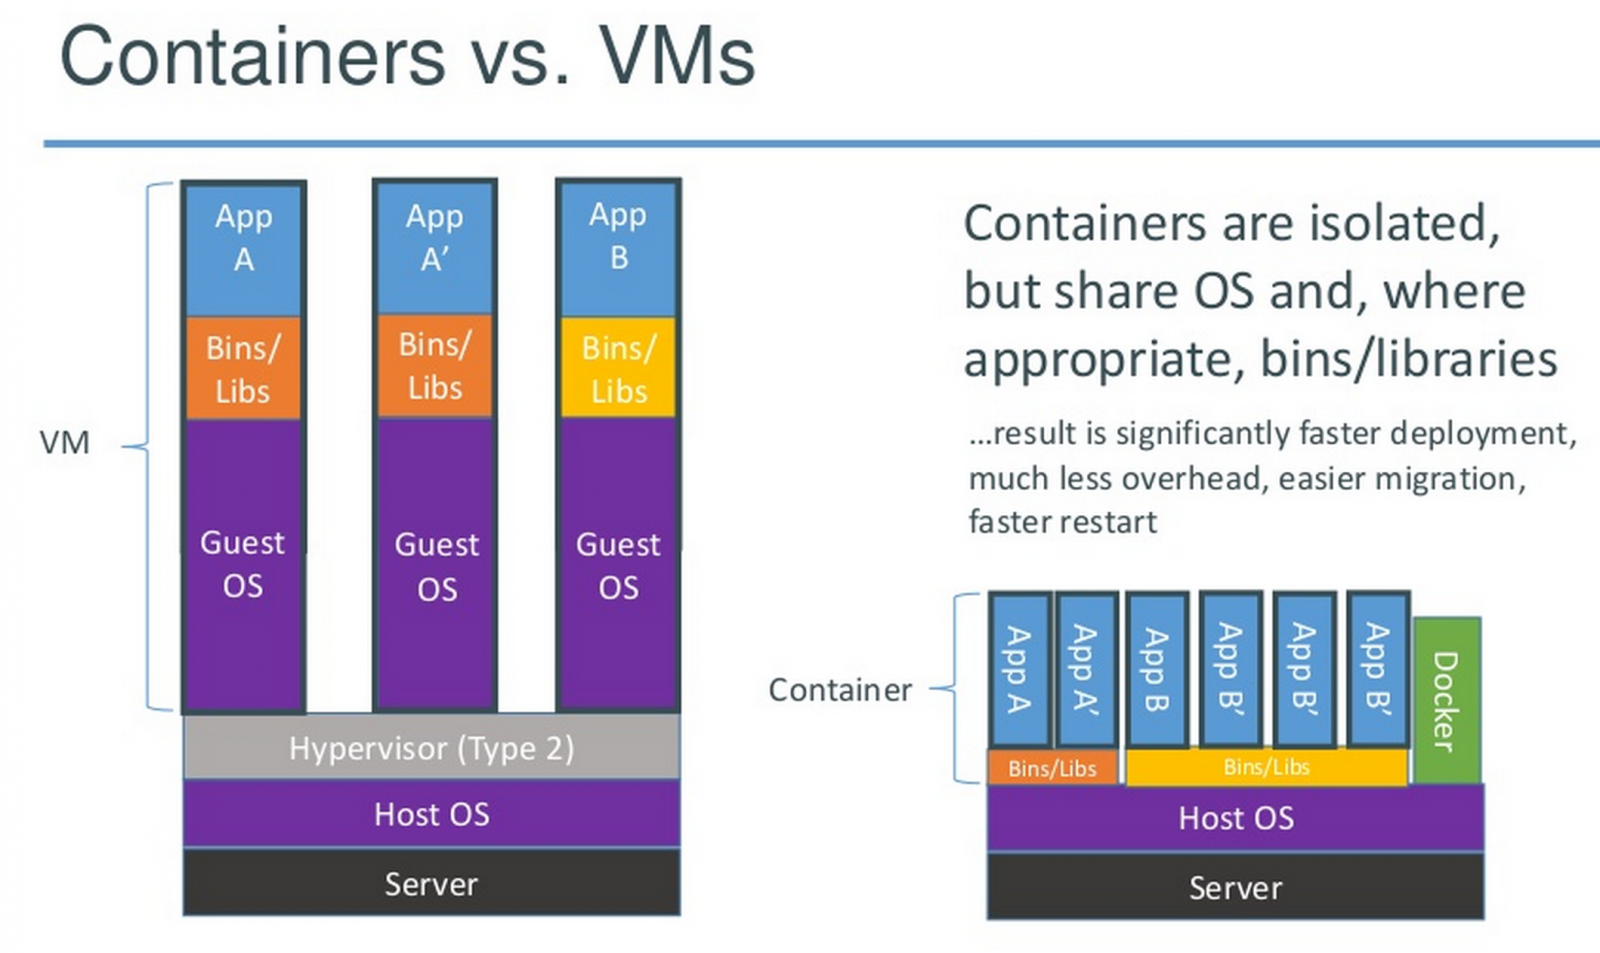
Concept
- 映像檔(Image) Docker 映像檔就是一個唯讀的模板。 例如:一個映像檔可以包含一個完整的 Linux 作業系統環境,裡面僅安裝了 SSH 或使用者需要的其它應用程式。映像檔可以用來建立 Docker 容器。
- 容器(Container) Docker 利用容器來執行應用。 容器是從映像檔建立的執行程序。它可以被啟動、開始、停止、刪除。每個容器都是相互隔離的、保證安全的平台。
- 倉庫(Repository) 倉庫是集中存放映像檔檔案的場所。有時候會把倉庫和倉庫註冊伺服器(Registry)混為一談,並不嚴格區分。實際上,倉庫註冊伺服器上往往存放著多個倉庫,每個倉庫中又包含了多個映像檔,每個映像檔有不同的標籤(tag)。
Installation
Ubuntu and Debian
install-docker.sh
1
2
3
4
5
6
7
8
9
10
11
12
13
14
15
16
17
18
19
20
21
22
23
24
25
26
27
28
29
30
31
32
33
34
35
36
37
38
39
40
41
42
43
44
45
46
47
48
49
50
echo "   ################################"
echo "      Installing System Updates... "
echo "   ################################"
sudo apt update && sudo apt upgrade -y > ~/docker-script-install.log 2>&1 &

pid=$! # Process Id of the previous running command
spin='-\|/'
i=0
while kill -0 $pid 2>/dev/null
do
    i=$(( (i+1) %4 ))
    printf "\r${spin:$i:1}"
    sleep .1
done
printf "\r"

echo "   ################################"
echo "   Installing Preq Packages..."
echo "   ################################"
sleep 3s

sudo apt install curl wget git -y >> ~/docker-script-install.log 2>&1

sleep 3s
echo "   ################################"
echo "         Installing Docker"
echo "   ################################"
curl -fsSL https://get.docker.com | sh >> ~/docker-script-install.log 2>&1
sleep 2s
sudo usermod -aG docker "${USER}" >> ~/docker-script-install.log 2>&1
echo "   ################################"
echo "           Starting Docker"
echo "   ################################"
echo $(docker -v)
sudo systemctl enable docker >> ~/docker-script-install.log 2>&1
sudo systemctl start docker >> ~/docker-script-install.log 2>&1
sleep 3s

echo "   ################################"
echo "       Installing Docker-Compose"
echo "   ################################"
VERSION=$(curl --silent https://api.github.com/repos/docker/compose/releases/latest | grep -Po '"tag_name": "\K.*\d')

sudo curl -SL https://github.com/docker/compose/releases/download/$VERSION/docker-compose-linux-x86_64 -o /usr/local/bin/docker-compose

sleep 2
sudo chmod +x /usr/local/bin/docker-compose
echo $(docker-compose -v)

sleep 3s
Create docker and add user to docker group
1
2
sudo groupadd docker
sudo usermod -aG docker ${USER}
Deploy a service
I deploy uptime-kuma for the example
Create NFS docker volume
The simplest way to create and manage Docker volumes is using the docker volume command and its subcommands.
The syntax for creating an NFS Docker volume includes two options.
1
2
The `--driver` option defines the local volume driver, which accepts options similar to the mount command in Linux.
The `--opt` option is called multiple times to provide further details about the volume.
The details include:
- The volume type.
- The write mode.
- The IP or web address of the remote NFS server.
- The path to the shared directory on the server.
create the volume, type as nfs
1
2
3
4
5
docker volume create --driver local \
  --opt type=nfs \
  --opt o=addr=192.168.100.250,rw,nfsvers=4 \ # ip of my NAS
  --opt device=:volume1/docker/data/kuma \
  uptime-kuma
we can inspect the volume info
1
2
3
4
5
6
7
8
9
10
11
12
13
14
15
16
docker inspect volume uptime-kuma
[
    {
        "CreatedAt": "2023-04-27T14:34:29+08:00",
        "Driver": "local",
        "Labels": {},
        "Mountpoint": "/var/lib/docker/volumes/uptime-kuma/_data",
        "Name": "uptime-kuma",
        "Options": {
            "device": ":volume1/docker_data/uptime-kuma",
            "o": "addr=192.168.100.250,rw,nfsvers=4",
            "type": "nfs"
        },
        "Scope": "local"
    }
]
run uptime-kuma and bind volume we created before
1
docker run -d --restart=always -p 3001:3001 -v uptime-kuma:/app/data --name uptime-kuma louislam/uptime-kuma:1
Docker-compose
we can also use docker-compose.yml to deploy
1
2
3
4
5
6
7
8
9
10
11
12
13
14
15
16
17
18
version: '3.3'

services:
  uptime-kuma:
    image: louislam/uptime-kuma:latest
    container_name: uptime-kuma
    volumes:
      - uptime-kuma:/app/data
    ports:
      - 3001:3001
    restart: always

volumes:
  uptime-kuma:
    driver_opts:
      type: nfs
      o: addr=192.168.100.250,nfsvers=4
      device: :/volume1/docker_data/uptime-kuma
Backup Image
ls the images
1
2
3
docker images
REPOSITORY         TAG       IMAGE ID       CREATED             SIZE
hello              latest    a8f72c57ea36   About an hour ago   918MB
save hello:latest to .tar
1
docker save hello:latest > hello.tar
if the image is too big, we can use gzip compress it
1
2
3
4
5
docker save hello:lateset | gzip -9 > hello.tar.gz

$ ls -la -h
-rw-------    1 root     root      897.0M Apr 27 12:03 hello.tar
-rw-r--r--    1 root     root      327.3M Apr 27 12:05 hello.tar.gz
Restore Image
1
docker load < hello.tar.gz
Uninstallation
1
2
3
4
5
sudo apt-get purge docker-ce docker-ce-cli containerd.io docker-buildx-plugin docker-compose-plugin docker-ce-rootless-extras

# Images, containers, volumes, or custom configuration files on your host aren’t automatically removed. To delete all images, containers, and volumes:
sudo rm -rf /var/lib/docker
sudo rm -rf /var/lib/containerd
This post is licensed under CC BY 4.0 by the author.